Tag Archives: Manufactured Stone
Master Bath Remodel – Fireplace Phase
Posted by on March 20, 2015

We are pretty lucky to have a double-sided fireplace in the bathroom/bedroom. However, I am not a big fan of the tile surrounding the fireplace. As part of the master bathroom remodel, I decided to add wood mantels and stone to both sides of the fireplace.
Because this bathroom remodel project was so big… I decided to post about it in phases. If you are interested in the other phases, here they are broken down (I will link to the other phases as I post them):
This picture shows the bedroom side of the fireplace (taken before we moved in). The other side was surrounded by that yucky 4″ white tile that was pretty much standard with all houses built at the time.
 The fireplace part of this project started with making 2 mantels exactly the same way as I had before (as seen in this blog post) and adding stone (as seen in this blog post)
 Here they are installed using some rebar and epoxy.

 It took a while to find the time to actually install the stone, but I think it came out pretty well. It definitely went a lot faster than the other stone jobs I have done in the house (maybe because there was less of it, or maybe I am just getting better at it). Here is how they came out! Much better than they were before and the new mantels gives us another place to collect dust in the house 🙂

 Now it is time to get moving on the final phase of this project. New cabinets, vanity and mirrors are in order!
Fireplace Remodel With Stone
Posted by on May 10, 2013

The fireplace on the main level of our house should be a beautiful focal point of the living area, but it was…. well… builder grade. It could be much worse, but cheap ceramic tile and a skimpy white mantel were not demanding much attention. Neither was the tile on the floor in front of it.

Our fireplace before the remodel
For this project, I wanted to surround the fireplace with stone (or manufactured stone), raise the fireplace to accommodate a hearth (instead of just tile on the floor) and add a new rustic wood mantle. I had worked with manufactured stone before, but that was only a month ago when I added a fireplace to my basement. Luckily I learned a few things from the first install.
To get started, I removed the old mantel, tore out all the tile and disconnected the fireplace from the gas line (after turning off the main gas line of course). I built a box for the fireplace to sit on and had to re-frame a part of the outside wall to accommodate the fact that I also had to raise the vent pipe. Now I have a siding repair project, but that should go quick.
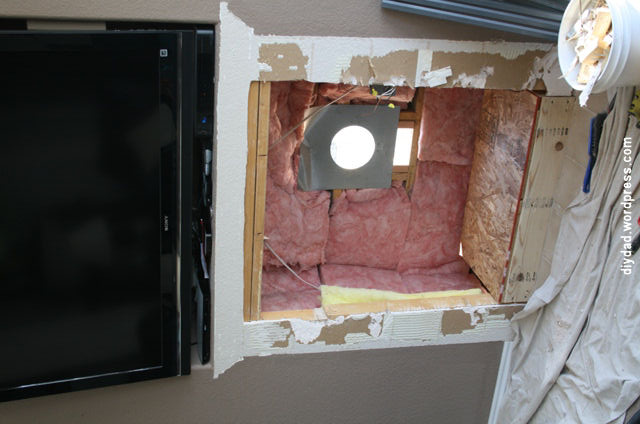
All the “builder grade” has been removed and the area prepped to put the fireplace back in
The gas line also needed to be raised by taking out a section of the old pipe and replacing it with a longer piece. I was pleasantly surprised to find out that Home Depot could cut and thread black pipe. After using some Rector Seal to ensure no gas leaks, the hole I had made in my wall was ready to welcome back the fireplace.

Newly raised gas pipe peaking over the box
Because I was installing the stone inside the house, I didn’t need to put up a vapor barrier and could put the metal lathe directly on the drywall after patching it. Metal lathe is nasty, nasty stuff and will cut you in half if you are not careful. Wear gloves (which I did) when working with it. It just needs to be nailed into studs with the “cup” parts facing up and separate pieces overlapped by a few inches. You can see I also built a box for the hearth stones to sit on as well.

Floor to ceiling metal lathe

Lathe is overlapped by a couple inches and nailed into studs
Next came the “scratch” coat. It is basically mortar that is smeared onto the metal lathe to give the stone something to stick to. The first time I did this, I actually put the mortar on smooth and went back and scratched it up before it dried. This time I just used a notched trowel and saved myself the hassle and mess.

Scratch coat is up on the wall
Now for the hard part… laying out the stone. We chose a field stone with various colors from Sunset Stone and in order to get all the pieces to fit into this giant puzzle, I went out into the garage and used some of the kid’s sidewalk chalk to draw out the areas we needed to cover with stone. The first time, my wife and I spent hours and hours trying to get pieces to fit and the color to balance only to find that the stone doesn’t install exactly like you lay it out and I had to add filler pieces anyway. This time we were smarter about it and focused on getting the colors balanced and getting the pieces to generally fit together. I also took note from my first stone install and made sure that none of the exposed edges would get cut.

This is a very big, very heavy jigsaw puzzle
When installing the stone onto the wall, I found it easiest to work with sections at a time, starting from the top. I set the big pieces that did not need to be cut and then would cut/set stones as I went. I also tried to set any stones with an exposed edge first to ensure that if I had any unplanned cuts, they would be on the inside. I just used an angle grinder with a diamond blade to make the cuts. Make sure you wear glasses, ear protection and a mask when cutting manufactured stone, because concrete dust is NOT good for you in any way. After all the big stones are set, I went back and cut/added filler pieces with scraps or custom cuts where there are big gaps between the stones. Easily the worst part of this job is cutting and adding the little filler pieces.

All of the stone is installed along with the hearth.
After giving everything a day to dry, it was time for the grout. It is the same mortar used for applying the stone to the wall, except that I colored it using Quikret Cement Color. It is a little un-nerving to pour some neon orange colored water into your cement mix and expect it to come out brown… but it did. Unless you plan on mixing a ton of grout, take note of how much liquid color you use to how much mortar mix (I used 1 oz. color to 16 lb of dry mortar). The easiest way I found was to mark a line on a disposable cup and to use a separate bucket to measure out my mortar mix. Grouting goes quickly and despite holding a 10 pound icing bag…. is pretty fun.

Grouting tools and neon orange cement color

Getting the grout installed (see… I am actually doing this stuff), and the grout job complete
Nearing the home stretch… I made a new solid wood mantel the same way I made the mantel for the basement fireplace.

Mantel is drying after its final coat of polyurethane
One night after work I got a bug and decided to go ahead and set the mantel with some 1/2″ rebar and some epoxy. I had used Liquid Nails and lag bolts with the heads cut off for the basement fireplace and the epoxy and rebar worked much much better. This project is done! … well … besides patching the siding on the outside of the house.

It’s all done!
A couple notes and thoughts about installing manufactured stone:
Mortar
- Be patient mixing your mortar. You may think you have not added enough water, but keep mixing until you are certain you need more water. I should know better, but a couple times I added too much water initially and had to hover over my mortar pan with an 80 pound bag trying to add a tiny bit of mortar to thicken the mix up (not fun).
- Let the mortar set for a while before using it. I would bring the mixed mortar into the house and start using it only to find that it set up a bit and I had to add a bit more water to make it usable. I just kept a container of water inside to splash and mix after it had set up a bit.
Stone Install
- A garage with a chalk outline of your stone area works great for laying out stone. I am sure stone masons do not even need this step, but us DIYers definitely need it.
- Do everything possible to have your cuts on the inside. Cut manufactured stone looks like concrete and it will stick out like a sore thumb.
- Use a spray bottle to wet your scratch coat before setting the stone… it makes a huge difference in the adhesion.
- Work from the top down to avoid dropping mortar on the stone.
- Do NOT try to wiggle the stone into position after you have pressed it onto the wall. This will just break the bond and you will be scraping mortar off the wall and the stone. Get it into the exact position first, then wiggle WHILE you press.
- Do NOT beat or bump the stone into place. You may cause the surrounding stones to fall off. Just press it onto the wall.
- On the edge pieces, wipe out the mortar (while it is still wet) that squirts out of the edge to give yourself a little cavity to fill with grout. Don’t worry about it on the inside pieces because those “mortar boogers” will get covered in grout anyway.
Grout
- Pay extra special attention to the grout consistency. If it is too runny, you will make a huge mess and most likely stain your stone. Too thick and it won’t come out of the bag. Don’t be afraid to dump out your grout bag and mix a little more water into it.
- Be very careful using a metal strike with manufactured stone. It will make marks on the stone if you are not careful. I still used a metal one, but most masons will tell you that a stick works just fine.
- WEAR GLOVES! These gloves will get destroyed during the process, but will save your hands. After using the strike, I would use my hands to smooth out the grout even further.
General
- Spend a little extra time covering everything up. I didn’t do this the first time and the mess was out of control. I tried to clean up after every major step and my carpet (and wife) appreciated it.
